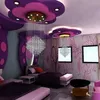
Photo: Chloe Count Without further ado, I'll explain everything on video for this DIY project you need!:
  Photo: Chloe Count
- 1 pool noodle
- Substance
- Bands
- Felt paper (felt)
- Foam plates (optional)
- Tape
- Scissors
- Hot glue gun
- Glue Sticks
- Exacto
- Stapler (optional)
Step 1
Form a circle with the pool noodle and the diameter you want your crown. When the pasta too long cut it with the exacto. Mount the two ends against each other. Hard to hold the two ends together and secure them with tape.  Photo: Chloe Count
Step 2
Cut strips of fabric in front that allows you to cover your crown. Too thin do not cut, they should be stacked to hold up well.  Photo: Chloe Count
Step 3
Start by making your first strip of fabric over the top of the crown (the tape). Hard wind through overlays, so it does not go fabric. Once you are sure you have identified yourself and how to follow the reasons (if basic), put glue on your starting point and a strip of glue on the end point.  Photo: Chloe Count
Step 4
Repeat step 3 with the fabric strips until full recovery of your crown. Make sure your fabric has stretched all the time. Register your last strip of hot glue.  Photo: Chloe Count
Step 5
For the manufacture of felt flowers, cut a circle of felt paper (it need not be perfect). Once the circle cut, cut inside, forming a spiral. The end of the spiral (located toward the center of the circle of felt) should form a small circle. This is the basis for the closing of the flower and glue it to the crown.  Photo: Chloe Count
Step 6
Winding the strip of felt, starting from the tip of the spiral. If all the rolled strip, drop a point of hot glue on the round felt (base of the flower) and paste petals.  Photo: Chloe Count
Step 7
Fold the accordion band. You can get all the top loops of the same amount or crescendo, as shown in the photo. Secure all tape together with hot glue or a stapler. Place your flower ribbon on your wreath by gluing the bottom, and the two ends on each side, to keep them open.  Photo: Chloe Count
Step 8
, To please my daughter, I have a bit of character in the center of my crown. To achieve this, I drew a spider on a foam paper I just cut and drilled later.  Photo: Chloe Count
Step 9
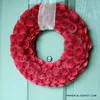
It remains for you to decorate your wreath. Position and glue your flowers, your ligaments, nodes, etc.  Photo: Chloe Count
  There is no manual for it! Let your creativity.
Tips and Tricks
- To get a nice ring, do not hesitate to crush the two ends of the noodles are well glued together before enrolling with tape.
- Easily wrap your fabric, especially if it is structured to roll without sticking your band. Once you have found, like the wind, so that the pattern repeat, pull down, stick the fabric, re-packaging and stick the end of the tape on the noodle.
- If you find it difficult to wrap a strip of fabric on some circle, you can print on your crown and wrap your ribbons on a flat surface. The crown is to regain its shape when the pressure is released.
- The felt flowers are simple to make. To diversify, you can cut circles of different sizes to get different sizes.
- You can also use 2 sheets of felt sleeves to achieve bicolored flowers.
- For the final assembly, when the crown lie on a table, it is not aware of go spaces to fill. Since they will be hung for decoration, make it the same for the decoration!
- To accompany my Halloween wreath I bought two pumpkins I slipped into a clinging to lace patterns. Finally, I have a knot on the tails. That's it!
 Photo: Chloe Count
Shopping and Storage
New! For the curious, who know where to deliver my material.
- Ribbons, paper felt, foam sheets: Michaels.
- Black and white striped Ikea.
Now you know everything to make your turn to share your tips, tricks, and where to shop! Write them in the comments; it's always nice to simplify your life by more than one trick up its sleeve. I encourage you to write the kind of projects that you may explain in pictures (as far as possible from my small hands). We look forward to your comments on this, I wish you all a good project and a Happy Halloween! Has this DIY Halloween? You might also like these Halloween decorations to make your own.
You might also like …