Photo: Chloe Count For DIY project, you need:
  Photo: Chloe Count
- Pots and containers airtight glass (style mason jars)
- White clay (my air dried)
- Cloth tape
- Parchment paper (baking paper)
- Rolling pin
- Punch
- Straw
- Stamps
- Knife
Step 1
Begin by cutting a piece of clay. They work to heat the clay and form it into a small ball. Flatten clay ball with your fingertips or with the palm of the hand. Point the sound between 2 sheets of parchment paper.  Photos: Chloe Count
Step 2
Spread the rolling pin on flattened ball, to obtain a flat surface. Lower your tone to about 4.1 "(3 mm) thick., We do not want too thick or too thin have labels. According to some tests, it is the strength that I found the aesthetic and more.  Photo: Chloe Count
Step 3
Once you also flat tone and good thickness, choose a cookie shaped piece come, cut the shape of your label.  Photos: Chloe Count
Step 4
With a straw, insert your label sound sides. The small hole you will set your label on the container.  Photos: Chloe Count
Step 5
With stamps, type the name of the content by light pressure. Attention! We go slowly so as not unduly distort our label and not pierce mainly.  Photos: Chloe Count
Step 6
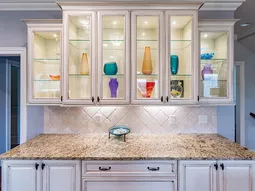
Now he is allowed to dry only the sound good 24 hours before placing in your glass.  Photos: Chloe Count Repeat as many times as desired, all the labels you need to achieve these steps. When everything is dry and hard, you hang your label on your glass container with a cloth tape. That's it! Beautiful, fast and convenient way to organize and sublimate in your kitchen cabinets!
  Photo: Chloe Count
Tips and Tricks
- You might as well carry these labels play dough or polymer clay (modeling clay that hardens in the oven).
- I decided to leave for my white labels. Know that nothing prevents you. Fully or partially color (color of the letters in a different color, for example)
- You can form and dry your label on your container so that it in shape.
 Photo: Chloe Count
- You can stick your labels directly onto your glass or container lid with hot glue or epoxy.
- Use this DIY project to make gifts! That's what I has to offer the spread at home!
 Photo: Chloe Count
Shopping and Storage
- Clay, stamps, ribbon: Michaels.
- Punch: Ikea.
- Mason jars: Canadian Tire.
You might also like …